Friday, August 13, 2010

Step 15: Still doing the pillars...now with pillar support added

Salam n g'day everyone....

I've been very busy with work recently...there's a few days where i was outstation travelling on a car which explains my lack of updates...

Anyway, there's not much visible progress going on in the house construction this week. the workers are given time off for 1st day of ramadhan (Wed). I met some of the workers on Thursday and the following conversation ensues..

Yours Truly (YT): Salam bang, apa khabar?
Worker X (WX): ya, alhamdulillah, baik saja
YT: So, macamana rumah ini, oke ka?
WX: ok saja, kami diberi cuti semalam. hari ini tengah buat tiangnya
YT: Ok bagus. macamana bekerja sambil puasa? ok ka?
WX: Saya minum tadi nggak tahan hausnya. laparnya bole tahan lagi
YT: owh..

So, as per usual, seems that the construction worker are not fasting. May God forgive them..

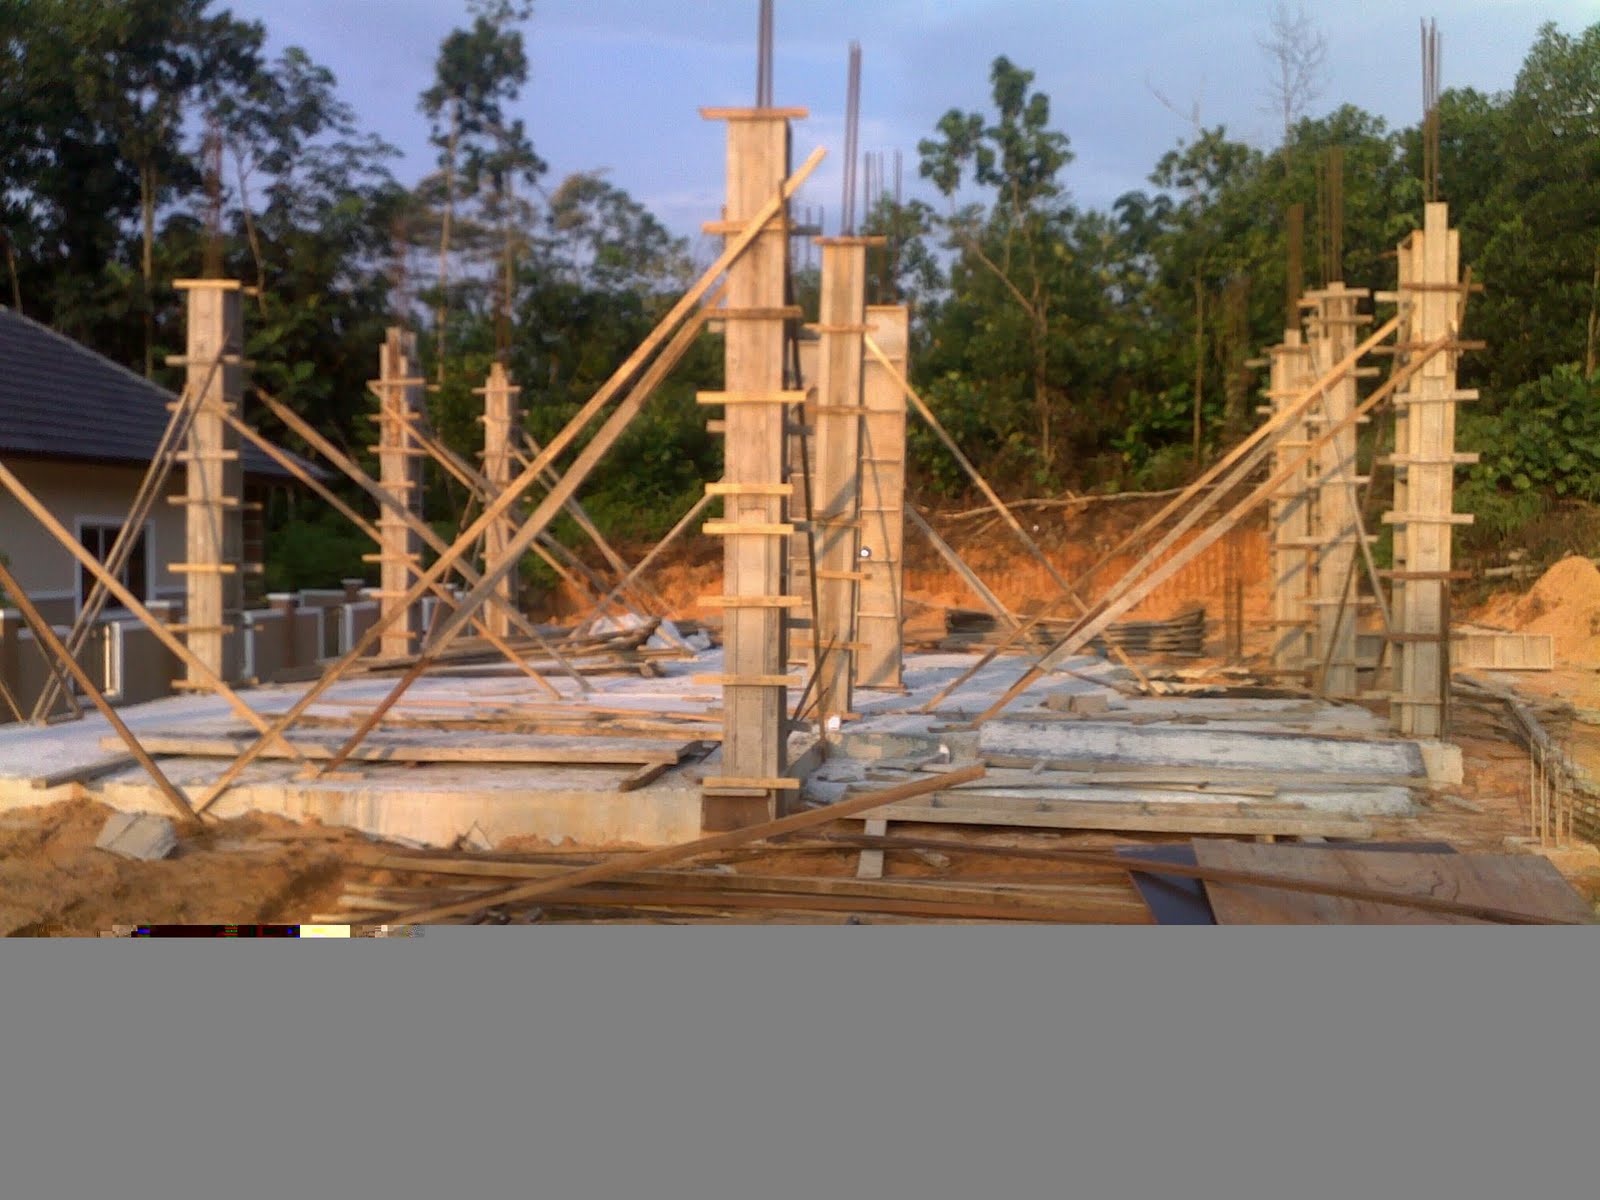
On the house itself a wood support is added to the casting, this to ensure that the wood will be straight and for addition of more wood & steel casting for 2nd floor and above (pics)
Ok. that's all for now..

By way of (typing on a new office laptop computer) AAMMJ

Monday, August 9, 2010

Of draining system

Salam and g'day everyone...

So, one of the thing that I had to do to the house is add a drainage system at the boundary between our house and our neighbor's. This is because, as the house is located on a hill area, the elevation of our land in relation to our neighbor's about a few feet high. Therefore, as I'm building the house and sort of terracing the land (to ensure that the land is flat) a few feet of retaining wall is required. So, to save the cost a bit, the contractor and us just decides to construct this little drain as to ensure that the elevation between our house and our neighbor's less visible and to ensure proper draining in case of heavy rain.

The draining system can be seen below


This is the pic of the drain today. It's actually not fully completed. Just for completeness sake, let me add another pic of the drain taken few days ago


For those of you with keen eye, you can see that on the right side of the drain, there's a tree. This tree has now been taken down...

By way of (A relative passed away today...innalillah) AAMMJ

Step 14: Adding more pillars

Salam and g'day everyone...

So...the progress today is not really a step 14...in fact they're just adding pillars (seems like the progress site will not be like this for a while yet). But, let's appreciate their work and see how many pillars have been added (pics below)


So, they've added 2 more pillars with steel and wood casting and there's be a few more (maybe 3-4, judging by the number of steel yet to be bracketed by the woods.

Also today, after work I managed to talk to the workers who're doing the house. There's a new guy in place apparently and with this addition, the number of full time worker (not counting site supervisor, engineer and others) are 6 people. We're thinking that we should be nice to them and probably treat them to good meal one of these days....especially with Ramadhan coming up and all of them Muslim..  May Allah bless them and us and bless our house (Notice that it's now OUR house instead of my house... :) )

Til later

By way of (Ramadhan Al-Mubarak everyone) AAMMJ

Sunday, August 8, 2010

step 13: now onto the house pillars

Salam n g'day everyone..

So, this will be the last post for today....and with this I've managed to update this blog up to the site progress!! (
yeay!! finally...huh...huh..pant...pant)

So, as the foundation is completed, the next step really is the pillars. This is actually a very labor & material intensive process. Notice the wood buildup there in front of the land


So, in order to understand how the pillar is made kindly look at the pics below


No, the pillar's not made of wood of course. but again it's made of concrete. The good ol Y12 steel is again used to make the support for the concrete as per the foundation and ground beam. Then, the wood braces are used as molding for the concrete. As I say earlier, this is a pretty labor intensive work. So, not much visual progress is made after 2 days (the latest pics from the site below will be testament to the point)


The wood and steel are getting taller!!

By way of (phew! done for the day) AAMMJ

Step 12: Concrete slab

Salam and g'day everyone...

So now, we're getting to the last part of the foundation of the house. with the completion of this step, the foundation of the house is now completed and we're ready to move on to the next stage which is the pillars and other house structure in general.

So, for this step, the concrete is poured onto the water-proofed plastic and wire mesh layer; covering them. the full base of the house is now visible

As it turns out the concrete slab is incomplete yet. there's still the ground floor bathroom and the front porch not completed yet and they'll have to come later for this


Alrighty folks...laters

By way of (one more post to go) AAMMJ

Step 11: More groundworks...

Salam n g;day everyone...

Well there's heaps of stuffs going on the last few days..they're not very visible on the structure but each are of great importance to the functionality of the house. I'll try to summarise them below for easy reading:
  1. Water proofing the ground beam: I've talked about this at some length in the previous post
  2. Putting back the soil in between the ground beam. So, the floor is won't be concrete slab all the way through. Soil is put back filling the ground beam until about half and inch thick. Only the top half inch will be filled with concrete slab
  3. Treating the soil with anti-termite pesticide. I was away when they do this...very unfortunate as I have no picture of this...so, just have to trust the contractor then
  4. Putting a layer of water proofed plastic? so this is put on top of the soil in preparation for the concrete slab later on. This has an interesting function. The marble / tile / cement floor here tend to feel very cold at night. This is actually due to water from the ground seeps through to the floor therefore making the floor feel really cold on the feet. So, this is the reason for putting this plastic layer
  5. Finally, steel mesh is put on top of the water proofing plastic. The steel mesh will give added strength to the concrete that will be poured in next
So, to conclude this post, let me show y'all 2 pics of item 4 & 5 above


By way of (this is starting to feel like a chore) AAMMJ

Step 10: Water proofing the ground beam

Salam n g'day everyone...

So, now, before moving onto the next stage of the construction, there's the important step of waterproofing the ground beam. This is done mainly to avoid water from seeping through the land through the ground beam concrete which will make it conducive for algal growth (as the pic i found in the internet below)


So, in order to avoid this, bitumen are spread onto the inner surface of the ground beam as they make it waterproof (see pics below...the black stuff is bitumen)


Rightio folks...later

By way of (getting tired...but still going) AAMMJ

Step 9: as the concrete solidifies...

Salam n g'day everyone

....wood casting are taken off. As can be seen in pics below

So not much is happening on the house now...and they're focusing on other items which i'll describe later on...till next time

By way of (still full from the steak lunch..huhu) AAMMJ

Saturday, August 7, 2010

Step 8: laying the ground beams...pouring on the concrete

Salam n g'day everyone...

Wow!! by now, I've exceeded my own expectation in posting today...this is alot of posts already and I'm almost catching up to the real progress made in my house construction.

OK, now onto the main dish...I've taken pics below about a week ago..

You might notice that this is the 1st time in this blog that my post has workers on it!! it's a Saturday, so I'm not working :p. So, today's activities is still completing the ground beam, they're now pouring concrete onto the casing / mold.

How many workers are there? well, there are 5 of them working on the house including 1 supervisor but wait...


There's actually another person driving the lorry. So, that's make 6 of them altogether today

K, till next time

By way of (OK, should be my last post b4 going out to KL) AAMMJ

Step 7: Preparation for ground beams

Salam n g'day everyone..

Well, well well...
I tot that I'm going out to KL already...but seems that I have more time....(not easy having to dress up and prepare 2 young kids..)

The next step now that the foundation is in place really is to putting together the ground beams. Ground beams are horizontal beams that is used to make boundaries of the house, the rooms and other important features of the house. They're also made of concrete, therefore the workers took a few days to prepare the wood bracing / mold for the concrete. As per the foundation, the steel are also put in place in between the wood molding (see pics)


Now, we can already see the boundary of the building therefore, what I do after working hours (besides taking pics obviously) was to measure the house boundary and see if they're similar to the Plan. As it turns out, they're similar to the plan which is good

Till next time

By way of (Wonder if I have time for another one) AAMMJ

Step 6: Cover ze holes

Salam and g'day everyone...

Now, after the footing was completed, the holes are then covered by putting back the soil into it (pic below):


You can see that the stem / leg of the footing is up to the level of the soil. So, now we can already see the level of the house already.

By way of (Getting ready to go to KL) AAMMJ

Step 5: Footing leg / stem

Salam and G'day everyone..

What's next? let me post a pic or 2 for yer


Well, the above are what I meant by the footing leg / stem (dunno wat is the actual term in construction world...but since I'm a layman...i'll use wateva cross me mind really) . So, this structure is about 1' by 1' in size and sit atop of the foot(ing). It is strengthened by the Y12 steel that it encloses.

Now, does this remind you of something? This is sumtin that I just learned as well, doesn't this looks exactly like the house footing in rumah kampung (pic for yer - I took the pic from another site via google search)?


rightio....bye for now

By way of (posting in-between prepare bfast, eat bfast, prepare Ahmad's bath, washing some clothes...) AAMMJ

Step 4: House footing

Salam n G'day everyone,

Hi there again, if you've guessed that the holes are for the house footing then you're absolutely right!! Well, footing is one of the few types of foundation that is used in house construction... others are piling, use of concrete slab, or even a basement flooring as a construction (one of these days I might write about house foundations...i wish)

I remembered in my basic engineering lesson in school days, one of the method necessary to make a stable structure is to remove the land of equivalent mass to the structure (that's why is tall building, the holes are deeper i reckon)

Okay, enough of the nonsense, let's get to some pics


In the pic above, you can see that there are steel (a BS Y12 steel) use in this house construction. The steels are bunched in 6 as they're required to support the 2-storey house. Now on to the foot(ing) pic


The footing are made of concrete. you can still see the wood braces around the structure (they will soon remove it). The wood structure are there as to mold the concrete into its shape. The foot(ing) size is about 3' by 3' and the steels sit atop of the concrete and they're bound by it. (actually i think that this blog is moving pretty fast here...the construction itself only took one day and I'm at work :( during the process. I'm only taking pics b4 n after working hours unfortunately)

Laterz bro....

By way of (It's easier to just typed into the blog than using MS word, innit?) AAMMJ

Step 3: Digging holes on the ‘X’ Mark

Today it’ll be short and sweet. They’re digging holes on the red ‘X’ marks (pics)


So, what are holes for? Wait for my next installment my dear good readers

PS: Also, as you can see in the 2nd pic the sand and gravel for the concrete are ready, maybe some of you can guess what the holes are for then)

BTW, I 1st wrote this post in MS word, but then....I couldn't get the pics to be pasted in the blog. Is this not possible? what a shame...
By way of (oh my portable harddrive, where art thou?) AAMMJ

Step 2: Marking the house boudaries Pt. 2 and the Workers house

Salam and g'day everyone

Well, after 2 days waiting...it's still no progress on my house..(see pics below)


Oh yeah...b4 i forgot the house in the pic above (on the left of my land) is the house of my neighbor. Now back to the construction site there are some progress made... the workers house are now completed...


So there you go. as you can see, the house are made of plywood and some part of it is covered by zinc. The small building next to the house if the dunny for the workers (hehehe)

In relation to the my land, the worker's house in place on the right which at the moment is a vacant lot.

Oke-doke, till next time

By way of (less word more pics) AAMMJ

Step 1: Marking the House boundaries

Salam and g'day everyone.

Next, I'd like to share the progress of my house in a step by step guide.
The first step is really just marking the house boundaries as below:

You can see that the contractor uses boundaries from plywood (actually there are some bit of strings as well, but we can't see it here).
Here's another angle of the boundaries

On the picture above, you can see the red 'X' or '+' marking on the land. That's where the house pillar will be put.

That's all for now

By way of (hmmm...) AAMMJ

Friday, August 6, 2010

Buying a piece of land?

Salam n g'day everyone...

we'll let's get straight to the piece now shall we..
let's see; buying a piece of land...sound straightforward enough; but only before you consider the real purpose of doing this, what shall we do with our little investment...or divestment one might ponder..

as is central to the theme of the blog..hehe..we'll talk about buying a piece of land for the purpose of house construction. (at this stage I'm putting some sortof disclaimer here...this might only apply to buying a land in Selangor, Malaysia.. other places might be a bit different). Also please bare in mind that I'm not a subject matter aspect in either house construction or land property investment, I'm just here to share my experiences; so expect mistakes aplenty in my writings!!

There are a few important aspects that need careful evaluation before we buy a piece of vacant lot, here's some of them
  • Land title - this is perhaps the most important aspect of consideration. land title in Malaysia can basically be categorized into industrial, agricultural and residential land titles. it's important if we're building a house that we're buying the one gazetted for residential building. Agricultural land are normally cheaper...but they have a catch. they normally need to be converted into residential land title and this may take a few years (and some money!!) to be converted
  • Residential land title have different types as well - they can be listed as freehold or leasehold. As a general rule the better one to buy are freehold as for leasehold they're normally limited to 99 years
  • Buying a land for construction also will of course follow the golden role in property investment...location, location, location
  • This is somewhat related to location but also important is the land elevation and flatness.  This will impact the construction later on as the need to build retaining wall will definitely increase the construction pricing.
  • Finally, infrastructure readiness. Are there access road? if they are, is it paved? what about water and electricity? also plumbing?
So there you go folks. There are many things to consider when buying the land.. which is why i feel that doing house construction is just like managing the projects at work..

On a final note, the above list are not meant to be exhaustive, rather just as a set of basic rules that i believe would be useful.

By way of (urgh, writing a blog is not easy) AAMMJ

Saturday, July 31, 2010

Introducing....

Assalamualaikum...


G'day readers. Hope that you all are in good spirit and have a fun time.

  • About the author -> Just click on about me and you'll get the idea..
  • Objective -> I wanna write about my experiences in building / construction of our house in Klang Valley. specifically in B.B. Bangi area
  • Target readers -> anyone really... especially myself as I wanna record all the process in doing this contruction. I always feel like this is a big project; like the one I do in the office. 
  • Expectation -> Reading this recordings...I'm hoping to make it easier for someone out there to follow my footsteps...if you want that is. or maybe easier for me the next time..if there is a next time there is
So, that's about it really; I do hope that you'll enjoy my ranting and rambling and til next time

By way of (after many days (maybe months) I managed to overcome my laziness and start this blog) AAMMJ